Sourdough bread is nearly addictive. It has a unique crisp crust and a chewy interior. It makes amazing toast or grilled sandwiches. Not all restaurants offer sourdough bread as an option but when they do, consider yourself lucky. Always choose sourdough!
Bread has been a staple food for all of human history. The first documented production of sourdough bread was in Egypt, likely around 1500 BC. Egyptians observed when flour and water were left out long enough to ferment, the resulting dough increased in volume and could be baked into bread.
Jewish people learned how to make sourdough bread in Egypt and took that discovery with them when they fled the region. From then on, sourdough spread throughout Europe and the Middle East, becoming a common and popular way to make bread.
This method grew in significance until dry yeast as we know it today was introduced in the mid-1800s.
Sourdough became popular in the United States, too. During the California and Klondike gold rushes, sourdough was a staple food of gold miners because of its long shelf life and use as a leavening agent. Sourdough continues to be popular in these areas today, and some bakeries claim that their sourdough is the same strain that was used over 150 years ago.
My personal sourdough baking adventure started when my friend Colleen put a message out on Facebook. "Who would like some sourdough starter? I have way more than I can use." It sounded like an intriguing experiment for the newly found time on my hands at the height of the shelter-at-home phase of the COVID 19 virus.
I drove out to her home to pick up my new project. She handed me an innocent-looking little Rubbermaid container filled with the newly made starter. Then, she gave me a sheet of instructions and a sheaf of recipes in a manila file folder. This warning was boldly written in red marker on the cover. NEVER USE A METAL SPOON OR BOWL!
When I started to drive away, she chuckled softly and said, "You might be sorry you got involved with this undertaking. It's one more thing to add to your daily to-do list!" I heard what she said but I kept thinking about what terrific grilled sandwiches it would make.
When I got home, I transferred the cupful of starter into an old green Tupperware lettuce crisper bowl and gave it the first feeding of milk, sugar, and flour. After all the lumps were dissolved, I snapped on the lid and put it in the refrigerator.
The instructions said to use a container that is at least four times larger than the original amount of starter. My bowl holds two quarts so it's a perfect size.
For the next four days, I simply stirred it well and put it back in the refrigerator. On day five I fed it again. Then, for four more days I stirred, I covered, and I refrigerated my starter.
On the tenth day, hallelujah, it was finally time to bake some bread!
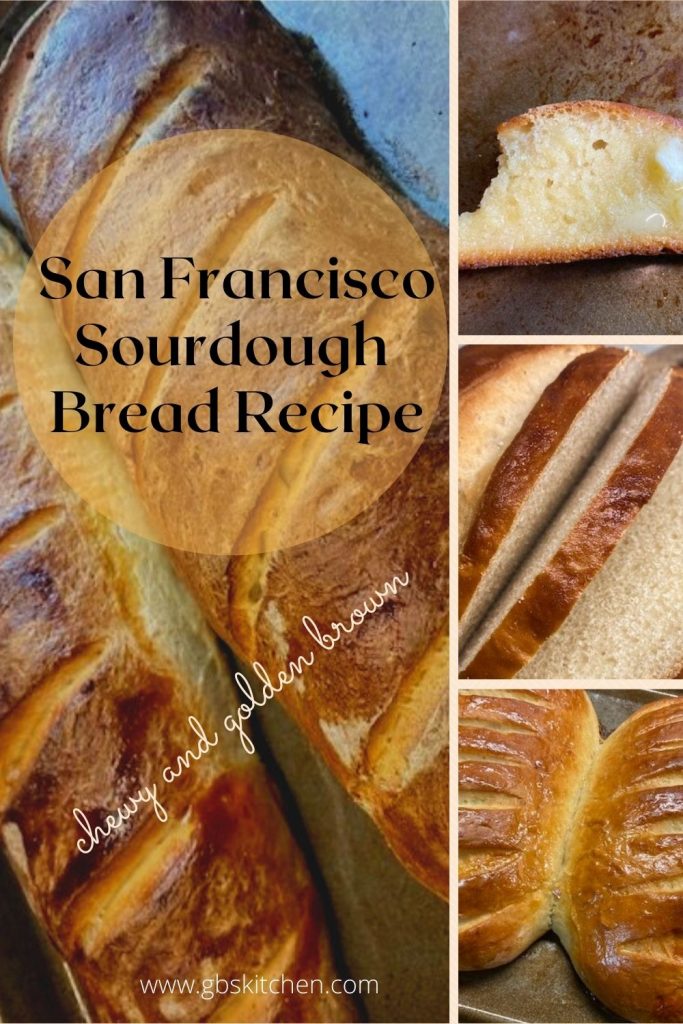
This recipe makes 2 loaves of San-Francisco style sourdough bread.
Measure out 1 1/2 cups of starter to make your first two loaves. Today you can give a cup of starter to a friend the way Colleen did. However, I have kept all the starter for myself most of the time. I just feed it and return it to the refrigerator.
When I do it this way, I have more starter to work with and can bake four loaves instead of two each time. This makes very happy friends!
I used a stand mixer from start to finish and found it was extremely easy to do. Of course, you can choose to do it with a hand mixer or spoon and knead the dough by hand. Channel your inner log cabin dweller if you like. It's entirely up to you. But for this, I love my big strong Kitchen Aid mixer. It is a dependable old friend.
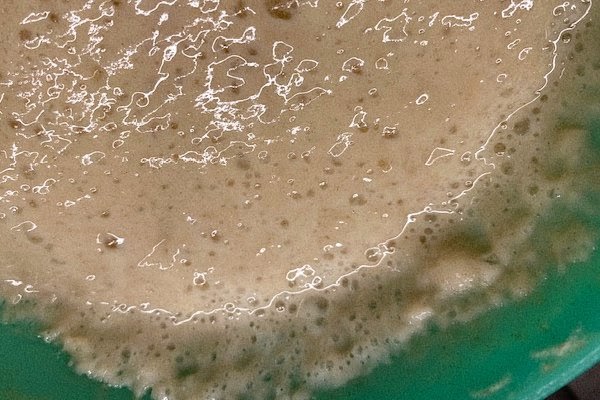
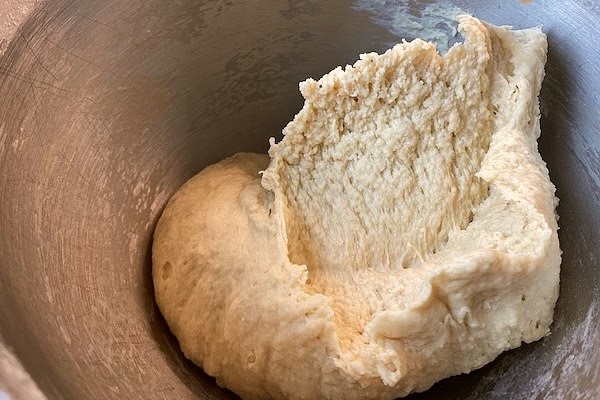
To the starter, you will add warm water, yeast, sugar and salt, and a little butter. I like to use the whip attachment at first to get everything well blended and start developing the gluten. When I've added enough flour that the mixture starts getting too thick, I change to a dough hook.
Next, I add flour gradually until the magic moment when the dough starts to pull away and "clean" the sides of the bowl, like in the picture above. At this point, I add flour in tiny increments. I add only enough until I can pinch the dough without it feeling sticky.
Sourdough produces a smooth ball of dough that is silky and smooth as a baby's cheek. It is truly a joy to handle.
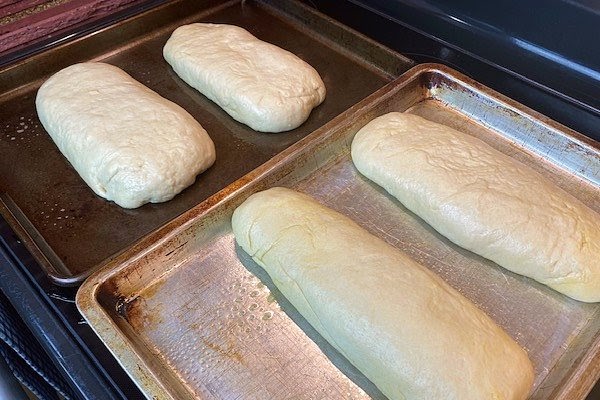
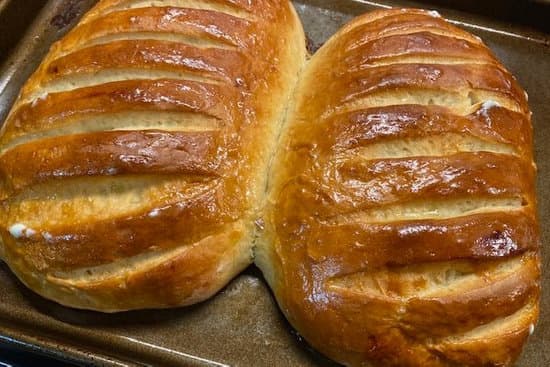
Now you can shape your loaves and put them on a sheet pan you have greased or sprayed. It will typically take a little longer to rise that ordinary yeast bread. As it does, it forms a beautiful texture so be patient! The dough needs to rise until it's double in size.
Find a nice warm spot in your kitchen and cover the loaves lightly with a clean towel. Now, wait while the yeast works its magic. Tick-tock, tick-tock.
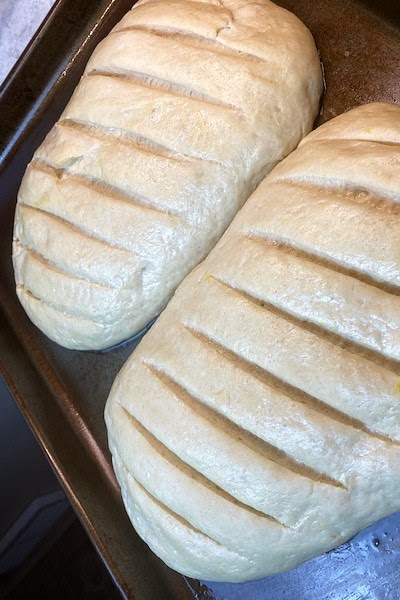
When the bread has doubled in size, score the top of each loaf in several places with a serrated knife. Using a pastry brush, gently apply the egg wash evenly over the entire surface of the loaves. This is what gives the bread it's beautiful, crispy, golden crust.
Now bake until it's evenly browned and sounds hollow when you tap on the surface. Set on a rack to cool and try to control your urge to tear into the hot loaf!!
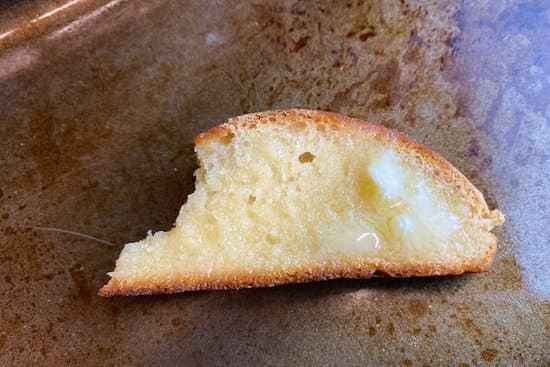
Give your loaves a chance to cool a bit so you can handle them easily. Slice off a piece while it's still warm and slather on some real butter. This, my friend, is bread heaven.
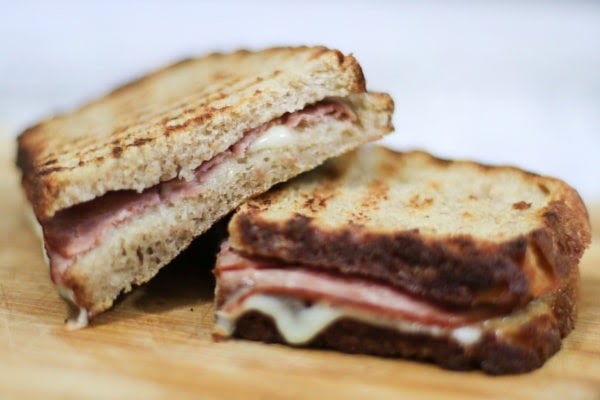
Later, you can use this amazing loaf to make the most delicious grilled cheese sandwiches ever. It's perfect in a panini press, too. Butter the outside of each slice and fill with shaved ham and paper-thin slices of sharp cheddar cheese. Yum! I bet it would make incredible French toast as well!
Sourdough starter can be transformed into more than just bread! Use it to make yummy cinnamon rolls, donuts, biscuits, or pancakes. Sourdough baking is very popular right now and with good reason.
There are no chemicals or preservatives in sourdough. It's full of beneficial bacteria that are good for gut health. It's easier to digest than commercially baked bread and has a lower glycemic index. Best of all, it tastes amazing! Go for the win!
A chewy golden brown bread with a distinctive flavor, perfect for grilled sandwiches
If you don't have a friend like Colleen who gives you some of her sourdough starter, don't despair! It's very simple to make your own with just a few pantry ingredients. It will take a little bit longer but will be ready to use in 15 days. Here's a sweet starter recipe for you. Sometimes it's known as a "Herman" starter.
Once you start baking with Herman, you can make a fresh batch of bread, donuts, pancakes, cinnamon rolls, muffins, or even brownies every ten days. You can find loads of recipes online! And, with good care, your starter can live for many years and you can share it with all your friends!
What will you make with your starter? Sourdough bread is a great place to start and it tastes so good the first loaf will disappear before you know it. I'd love to hear what kind of sandwiches you make with it. Please share your ideas!
If you enjoyed this recipe today, please share it on your social media accounts like Facebook, Instagram, Twitter, and Pinterest. We'd be tickled and ever so grateful, thank you!
If you haven’t already, check out our Facebook page where we’ll be posting easy, delicious, and family-friendly recipes every week!
Sign up for my newsletter and receive a free gift! A printable sign that would look great in your kitchen, framed above your sink, or just placed anywhere to remind us how lucky we are to have dirty dishes!
 Sign up now!
Is the amount of yeast 1/4 ounce or 1 packet of yeast. I don't want to make a mistake.
1 packet of dry yeast. It doesn't matter if it's regular or fast-rising yeast. It's so delicious! Just takes some patience!
Your math seems to be off. Steps 9 and 12 both say let stand for 60-90 minutes each. Best case is 2hrs standing/resting time while worst case is 3 hours standing/resting. This means your recipe cannot be accomplished in the 2 hours or son including baking time. I am going to guess this will take me about 4 hours start to finish.
I am genuinely grateful for your questions. Writing directions for baking sourdough from ready-to-use starter was a challenge. Exact instructions are often difficult to write but I try hard to make them clear!
Bread making is, at best, an inexact process, and many conditions can change the time required.
The dough takes about 15 minutes to make.
The first rising of the dough takes about an hour but can take longer, possibly 1 1/2 hours.
It only takes a few minutes to divide the dough in half and form it into loaves.
The second rising of the shaped loaves generally takes less time than the first rising. It could be as little as 45 minutes or as long as 1 1/2 hours
If everything would move along quickly, the process could take 2 3/4 hours or so.
If the rising is pokey, the process could take nearly 4 hours as you calculated. You are right!
I'm not sure the template for recipes will allow me to list times as "approximate" or with a range of time but I will take a look at what I can do to make it more clear!
My suggestion would be to allow plenty of time and make something like this, especially the first few times when you aren't on a tight time schedule!
Bless you, for reaching out!
Thank you! I hope you try it and let me know how it turns out for you.
Bread making requires love, patience, and practice!
I tried putting in a time range on the rise times and the template has no code for that apparently. I edited it to prep 15 minutes, rise 3 hours, and bake 30 minutes. The only place I could get more detail is in the instructions but I will contact support to find out if there is some kind of workaround. Thanks again.
The starter recipe says bake in 15 days your recipe say bake in 10 days?
If you have the starter ready to go as I did with my first batch from my friend Colleen, you can bake in 10 days. If you make your own starter, it will take 15 days from start to finish. Sourdough takes patience, love, and practice but it's worth it!
Do I divide again at day 10????
So Do I divide again at day 10????
I think you are looking at the starter recipe post. No, you won't divide again until the day you bake. On the day you bake, you can give away or throw away a cup of starter.
It takes 15 days(from the day you start the starter) until you bake.
After that, it's every 10 days. Once you have the starter established, you can bake every 10 days.
I hope that helps.
No just got a lot of Herman and wanted to be sure.
Than k you for this recipe. I have been struggling with traditional proofing, etc. and my loaves are not what I hoped. This is easy and straightforward. I do wish it had the 'chew' of the traditional sourdough, but it is great.
Have you followed and made it all the way through? It’s pretty chewy! I’ll circle back to this and see if I can add more “tang” later on. My Kitchen is my playground and my laboratory. If you like artisan type bread I bet you would enjoy the recipe I have for Dutch oven artisan type bread on my blog -if you have trouble finding it give me a shout and I’ll put you to it. it’s not only easy it is almost fool proof and amazingly delicious. And unlike the sourdough it can be ready the next day it’s about a 12 hour cycle. Good luck yeast is something worth knowing and using we should never be afraid of it. In fact I’m currently working on an all purpose used dough that can be used for breadsticks cinnamon rolls and even Runzas.
So they came out pretty and soft however not very sour as I’d had hoped any ideas on to make sourer ?? Wish I could post a picture I will be making again kids family like it will have to make again soon.
thank you
Dayna, I have some sourdough starter in the freezer from the original Herman my friend Colleen gave to me. I want to try to bake a loaf that's less sweet and tangier. I'm going to do some research and share what I find. Glad the kids liked it! It's good, but I'm with you, I'd like more tang.
So what I learned is you can add sour salt aka citric acid to your dough 1/4 tsp per loaf. Also use rye flour when you feed your Herman about 40% of your flour flour mix. So I’m starting this for my next bake. I did a second bake with citric acid and it did give it a good flavor. So now the rye flour will let you know. Also a bit of whole wheat.
Good to know about citric acid! Thanks, I used it when canning. So you plan to have all whole grain flour; wheat and rye going forward? No white flour at all? I'll be interested in hearing your results.
You use 40% rye with your all purpose flour or whole grain or wheat flour. I your all purpose flour and 40 % rye this next bake to see how sour it is. I use the citric acid on my last bake made a nice difference. Rye is supposed to be the way to go. I feed tomorrow then my bake day is Monday so I will update on flavor. Happy baking
I just can’t wait to hear how it all turns out Dayna let me know!
Rye flour does make it more sour and also decreasing the sugar in the Herman makes it not so sweet. Still playing with it though.
Hi, that was going to be my question, would you be able to use other flours and less sugar in the starter? Also Dayna, did you keep the starter in the fridge or leave on the counter? I am very interested in trying this starter and dough but being of German heritage, I hate to waste ingredients and wouldn't want this starter to go bad! Thank you for your recipes! 🙂
Diane, please allow me a little time to research. The yeast "eats" the sugar and needs it to stay alive. I'm not sure how much less you can use. I'm not experienced in using different types of flour in sourdough, but I'll dig into it. I kept my starter in the refrigerator once I got it started, as described in the instructions. I took it out daily to stir it or feed it. I think you could make milk from powdered milk, and that would save a little money. However, the ingredients are not expensive and I am a thrifty girl myself. Bakery sourdough costs so much more than when you bake it yourself; I think it's well worth it! You might want to check out my artisan bread recipe; that one is super inexpensive and is only an overnight process. https://gbskitchen.com/beautiful-rustic-dutch-oven-bread-recipe/
This is 'sour-faux' not sourdough. Sourdough doesn't have yeast in it, that's the whole point.
And as for adding citric acid and the like for sourness, good grief. Sourdough is pure and simple: starter, flour, water and salt. That's it.
I'm sure this is delicious, but it's not sourdough.
Hello, Nigel and thank you for taking the time to comment! A very clever name you have given to the bread, sourfaux! I love it. Yes, you are right, the earliest sourdough was made just like you describe and dependant on wild yeast spores in the air and help from Mother Nature. The recipe is not my own but I was given a small batch of the starter as you see in the story, and I took it from there. It may not be like Cookie on Wagon Train made it for the cowhands, but it is delicious. It may be cheating, but beginning with a bit of yeast and feeding it for months is a quicker and more reliable way to begin. It has a great chewy texture and a nice crisp crust so I am content to bake sourfaux. It was fun visiting with you!
I'm sorry, but you have no idea what you are talking about. Proper sourdough isn't something that disappeared years ago. It is alive across the world with millions of people baking without yeast all over the world every day. I have a loaf proving right now. And my sourdough starter was made from scratch with flour and water, that's all.
Oh, and 'sourfaux' isn't my invention. It was coined years ago when supermarkets were selling bread with yeast and starter and pretending that it was sourdough.
I don't mind experimentation in bread making and I love most bread, yeast or not, but please do your research before you write recipes.
Try this instead! https://www.weekendbakery.com/posts/san-francisco-style-sourdough-bread/
I did not mean it's dead or no longer works. Thank you. You win.
May I use bread flour? Or, is it better to use all-purpose?
Either type of flour will work just fine! Bread flour has more protein and produces more gluten but all purpose flour makes good sourdough too. On yiur marks. Get set. Bake!
Hello, do you use fed starter for unfed? I have tried two separate recipes pre and post fed which yielded vastly different looking results but tasty bread.
I am so sorry for the late reply, but I have no idea what you mean. Tell me more. This recipe starts with a starter you make, then continue to use it as long as you make sourdough bread.
I had alot of starter left over. Can I freeze or continue my starter? If I continue feeding it do I pick up on day 10 and start over?
Thank you and sorry so many questions this is my 1st time making.
Sorry for the delay. Yes, you can!
Copy and paste this helpful link into your search bar to learn how! I have some in my freezer right now!
https://www.thespruceeats.com/freeze-sourdough-starter-428055