

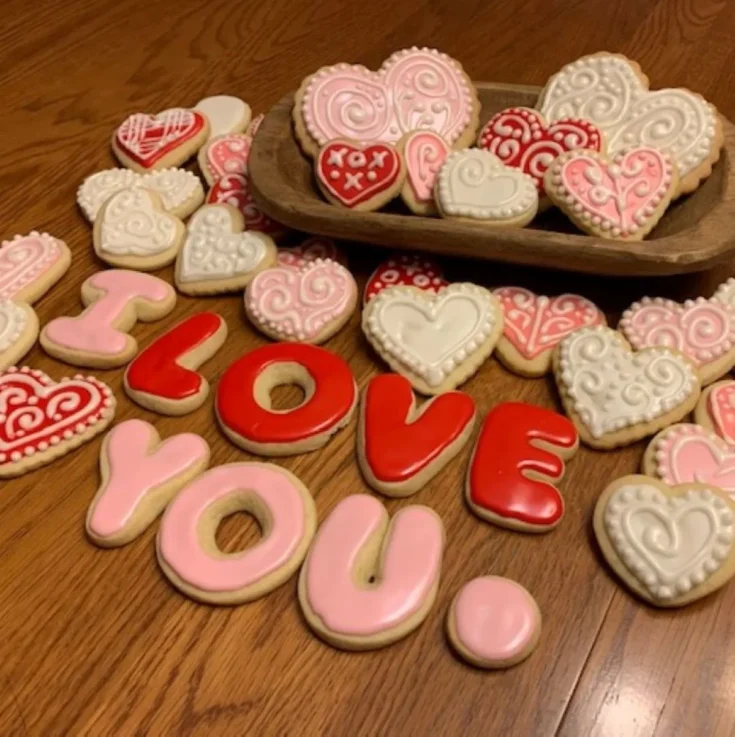
These beautiful frosted Valentine's sugar cookies are so perfect-looking; they are inspiring without a doubt. You may think you could never achieve results like this, but you must think again because you can!
My friend Katie, a retired grade school principal, has found a way to make these beautiful frosted sugar cookies doable. Katie considers herself a "newbie" at baking, but she is excited to share her discoveries with as many people as possible! Thank you so very much, Katie! We love that trait in educators! They never quit learning and finding ways to teach, guide, inspire, and encourage.
Let's begin with her terrific frosted sugar cookie recipe. As you can see, it's pretty basic, but if you follow the extra steps, they are virtually foolproof! The flavor is outstanding; the cookies do not spread very much as they bake, and you can cut them easily into any fun shape! The complete recipe with instructions is on a printable recipe card for you.

If the dough seems too soft and sticky, add a tablespoon or so of flour and knead it into the dough.
Next, divide the dough into four balls and place each portion on a lightly floured piece of parchment paper or silicone baking mat. Dust the rolling pin with flour, and roll each dough ball out to 1/4″ thickness.
Stack the layers of the cookie dough circles on a baking sheet with parchment paper between layers. Cover the stack with plastic film or aluminum foil and refrigerate for 2 hours or up to 2 days.
When you are ready to bake your Valentine's sugar cookies, preheat the oven to 350 degrees. Line the baking sheets with parchment paper. Cut out the shapes you want and arrange them about one inch apart. Bake for 10 to 12 minutes until they are lightly brown. Cool on the cookie sheet for a few minutes before transferring them onto a cooling rack.
Gather up the dough between the shapes and form it into a ball. Roll it out to 1/4 inch thickness and cut more shapes! You can use the last bits of dough to create initials or any whimsical shape you can dream up!

Now, the fun begins! It's time to decorate! Thanks to the corn syrup, this recipe will give you royal icing that's easy to handle and dries with a beautiful shine. A printable recipe card is included in this post.
This recipe is the reigning queen of all royal icing recipes for frosted Valentine's sugar cookies! Although there's milk in the icing, it can sit out in tightly covered containers all day while decorating. You don't need to refrigerate the frosting, but try to use it all within several hours. You can even finish up the next day.

Katie's other secret is AmeriColor Gel Paste Food Coloring. She swears by it. Here are some of the advantages of gel-type food coloring.
Katie calls herself an amateur, but her amazing sugar cookies look very professional! The secret to her seemingly flawless results is the tool she uses. Silicone bulb dispensers allow for tidy, easily dispensed icing.
Katie loves her Prepworks by Progressive brand dispensers. The dispensers appear in the top photo. You can find them in kitchen stores, online, and major retailers.

The bulbs were designed for children, but Katie says they fit her hands perfectly. Each bulb holds about 3/4 cup of icing, and they're dishwasher safe, so they're very easy to clean.
They are much more user-friendly than pastry bags for the average user and use the same tips. Katie quipped that dispensing frosting with a pastry bag "drives her to drink," although I think it's just a figure of speech in her case!
Katie uses the tip that a toothpick would fit into (with a little extra wiggle space) to outline the icing. It's a Wilton #2. Between colors, she puts a toothpick into the tip and lays the bulb on its side to keep the frosting fresh and ready to use. She uses the same Wilton #2 tip to spread icing inside the outline.
Another key from Katie is, "I put all the white icing on every single frosted sugar cookie before adding any colors."
She struggled with tiny dots like buttons or eyes until she taught herself another trick. She uses a long toothpick to puncture the surface of the icing, then twists and lifts when applying color. This technique helps prevent dragging icing "goobers" across the cookie. You may want to practice this move a few times on a test cookie, then eat it!!

There's no end to what amazing sugar cookies you can make with all the great sprinkles and edible glitter available today! Sugar cookies aren't just for Christmas! There are cookie cutters for every occasion! Have fun with it!
PRINTABLE RECIPE CARD
A simple but delicious sugar cookie recipe that ensures you will have beautiful results. They will cut and bake beautifully.
Key from Katie: The baking sheets should be completely cool before using them for baking another batch. At Christmas time, Katie sticks them outside between batches!
PRINTABLE RECIPE CARD
An easy royal icing recipe with a shiny finish that dries to the touch.
Although there’s milk in the icing, it can sit out in tightly covered containers all day while decorating. You don’t need to refrigerate the frosting but try to use it all within several hours. You can even finish up the next day.
Sometimes, we need to come up with some cookies really fast! Like when your son tells you at bedtime, he's supposed to bring two dozen cookies to school tomorrow! Here are a couple of ideas when speed is what you need! Chow Mein Noodle Haystacks and Festive Cornflake Cookies.
Hint: In a situation like that, almond bark is your friend! Dip any ordinary cookie (yes, even store-bought!) halfway in melted almond bark and add a few sprinkles before it sets! They look and taste amazing!

If you liked this recipe, you are my people! If you like this recipe, please share it on your social media accounts like Facebook, Instagram, Pinterest, and Twitter! It would sure tickle me, and I would be ever so grateful!
If you haven't already, please look for me on Facebook and Pinterest, where I will share easy, delicious, family-friendly recipes every week!
Love, GB (Betty Streff)
Sign up for my newsletter and receive a free gift! A printable sign that would look great in your kitchen, framed above your sink, or just placed anywhere to remind us how lucky we are to have dirty dishes!
 Sign up now!
Katie’s cookies always look so professional. I like the glossy look too.
Mine will never look professional due to the fact that I have many many helpers, and i wouldn’t have it any other way.
Thank you for sharing..I may try, when I get a chance alone.😊
You are lucky to have helpers!! We all have a long time to be alone. Thank you, Katie is pretty amazing!!